How To Upload and Manage Your Readers Usernames and Passwords
Overview
The ability to manage your users as outlined below depends on your authentication type. The primary authentication type for full management of your users in "User Managed", however you can also manage your users with Our Standard Authentication Types. If you have an authentication type other than standard, you can still deactivate and delete users. If you have any questions about your Authentication Type, please contact support at support@librarypass.com
Accessing Your LibraryPass Admin Portal
2. Type in your username and password.
Don't know your LibraryPass Admin Portal username and password?
Adding Usernames & Passwords
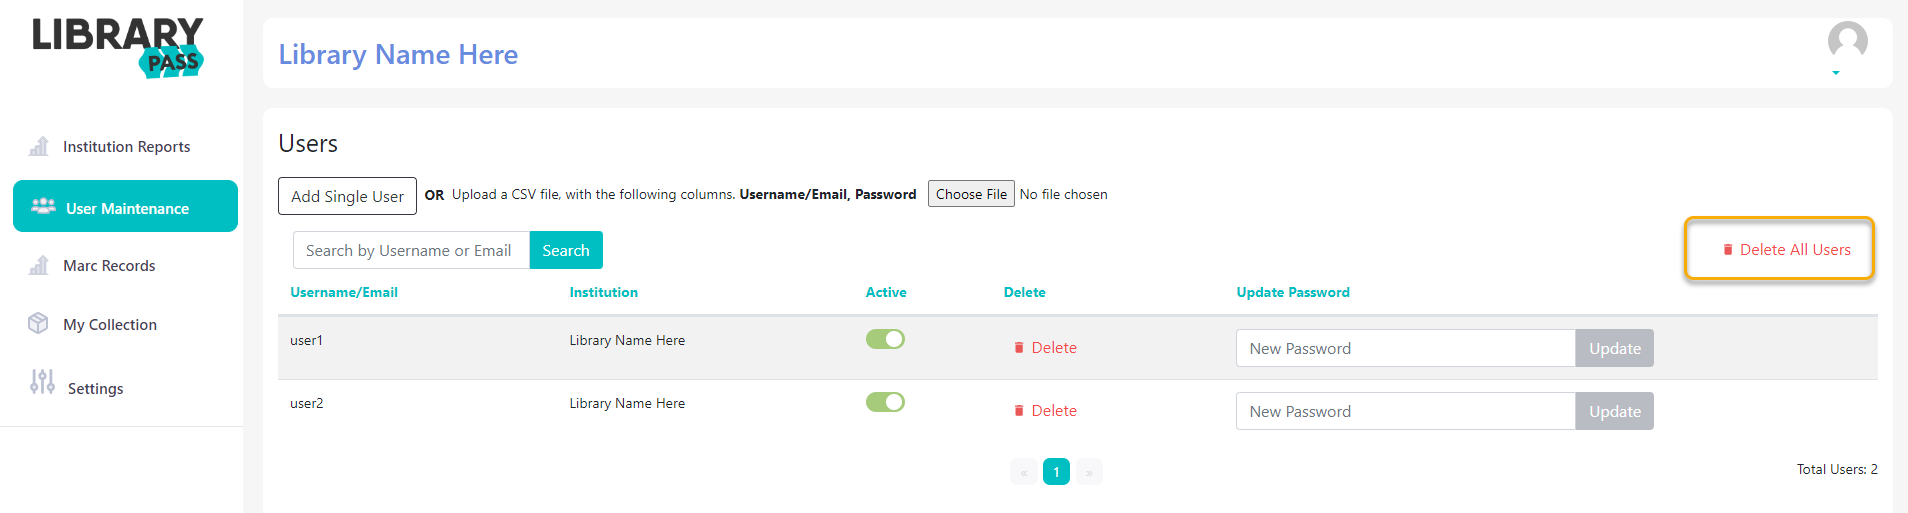
You can add a single user or mass upload multiple users at a time.
Uploading a Single User
1. Under the "User Maintenance" tab in your LibraryPass Admin Portal, click "Add Single User"
2. Enter desired username and password, click "save"
3. Your users will appear below where you can deactivate, delete or update passwords at any time.
Mass Uploading Users
1. Create a CSV file, with the following columns: Username/Email, Password. The first column should list all usernames and the second should list all passwords.
2. In your LibraryPass Admin Portal, go to the "User Maintenance" area.
4. Click on the "Choose File" and follow the on screen prompts to upload your users.
5. Once uploaded, your users will appear on screen.
6. Your users are now ready to login and use their very own LibraryPass account!
Updating User Accounts
Resetting a Password
In the "User Maintenance" area of your LibraryPass Admin Portal, find the user you need to reset. Enter the new password in the "New Password" field and select "Update".
Deactivating and Reactivating Users
In the "User Maintenance" area of your LibraryPass Admin Portal, find the user you need to deactivate/reactivate. In the "Active" Column, click the toggle that corresponds to the user in question.
 Gray Toggle indicates a "deactivated" user. This indicates they will be denied access at login.
Deleting Users

Deleting a user is permanent, if you just want to deactivate a user see the "Deactivating and Reactivating Users" section above. You can add users back by uploading them using the steps listed above.
Delete a Single User
To permanently delete a user, in the "User Maintenance" area of your LibraryPass Admin Portal, find the user you need to delete. Click the "Delete" button next to the username to be deleted.
Delete ALL Users
To permanently delete all users, in the "User Maintenance" area of your LibraryPass Admin Portal, click the "Delete All" button. This will permanently remove all existing Users. However, you can Mass Upload your users again to add them back in.

Related Articles
Reading Skills Reinforcements For Young Readers
Young readers need scaffolding, or training wheels, to help them focus as they read. Building and Reinforcing Young Readers’ Skills With Comics Plus, your beginning, early, and middle grade readers have unlimited, simultaneous access to a deep ...Admin Portal FAQs - Managing Multiple Collections
What Do I Have Access To In My Admin Portal? You can: 1. Access circulation information for all of your collections 2. Manage your member accounts' users 3. Pull MARC Records 4. Curate your member accounts' collections 5. Manage settings How Do I ...Summer Reading 2025 - Full Library Collection
Summer reading with Comics Plus Comics Plus Summer Reading Guide Summertime offers a welcome break from required reading and is the perfect time for your readers to color their world with exciting comics and manga! Your Comics Plus collections offers ...Book Tasting Resource Guide
Hosting A Book Tasting Event What Is a Book Tasting? A Book Tasting is a fun and engaging way to introduce readers to a variety of series they might be interested in but aren’t familiar with yet. Like a food sampling event, they can “taste” different ...Engaging Accelerated & Reluctant Readers
Recorded February 25, 2021 Our panel of experienced educators—Jesse Karp, Shveta Miller, Julie Ann Price, Susannah Richards, Ph.D., Jana Tropper—discussed their process for using comics to support readers of different abilities, how they partner with ...